
How to Take Virtual Staging Photos
💡 Want the short version of our photography guide? Download our PDF cheat sheet. We’ve seen all types of property photos, from dark and blurry

💡 Want the short version of our photography guide? Download our PDF cheat sheet.
We’ve seen all types of property photos, from dark and blurry to vibrant.
By the end of this article, you’ll know how to spot the good ones from the bad, when to hire a photographer, and what makes for great virtual staging photography.
Photographing for virtual staging doesn’t require any special techniques but there are a few things to keep in mind…
Virtually staged photos (and even vacant photos) look better when the photographer is standing away from where furniture is.
Standing in the doorway or corner of the room makes for excellent options and allows the viewer to see the room in its entirety.
Using an excessively wide lens can create a fishbowl effect. This makes it harder to accurately show furniture sizes. You’d be surprised at how many professional photographers are guilty of unintentionally distorting room dimensions by using the wrong size lens.
Virtual staging is popular among vacant homes. This often results in TV cable wires laying on the floor, moving boxes, and dust. Try to remove as many of these items from your photos as you can. In some cases, they can be digitally edited out but that could incur additional costs and sometimes not be possible.
Taking photos yourself or hiring a photographer can depend on your personal comfort level with technology, the type of camera or smartphone that you have and your budget.
Fortunately, hiring a professional is inexpensive. Any serious real estate professional should consider it the cost of doing business.
If you don’t have a good camera, have no idea how to get photos from your camera to your computer, or value your time more than it would cost to hire someone, then we recommend hiring a professional.
iPhone Tip! The iPhone and most smartphones have a relatively narrow lens. We recommend purchasing the Moment Wide Angle Lens. This a high-quality glass lens that attaches to your phone and makes the shot wider. You’ll be able to capture more of the room and it can really make a difference!
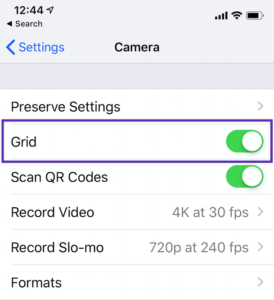
iPhone Tip #2! On your phone go to Settings > Camera on your iPhone and turn on “Grid” This will add a grid to your camera viewer which will help you better frame your shot.
If the room is very bright you may have to try focusing on different areas of the room to prevent “blow out” — when one area of a photo is much brighter than others and becomes washed out leaving other areas dark.
If you still have trouble with this try closing some blinds or standing in a different location.
This is where a professional photographer with a camera capable of capturing a wide dynamic range can pay off.
Some cheaper cameras and phones can’t handle the wide range of lighting. If you want to show a view out of a window and capture the room with even lighting at the same time it may be best to hire a photographer.
Repeat this process for all rooms in the home.
You never know when you’ll need these photos again so keep them in a safe place. Dropbox is one of our favorites or Google Photos is a great option too.
Now that you’ve got your photos, transfer them to your computer and put them in a folder named after the property address.
Before sending your photos to us for virtual staging, pick out the best ones you’d like to have staged. Rename each photo after the room and make sure they are in JPG format.
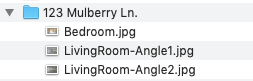
LivingRoom.jpg is better than DSC2083.jpg. This makes it easier for everyone to identify what room a photo is of. For many angles of the same room try “LivingRoom-Angle1.jpg”, “LivingRoom-Angle2.jpg” – This helps us identify the room and which angles are of the same room.
Download our PDF with a summary of everything discussed here. Want us to take a look at your photos? Email them to us.
💡 Want the short version of our photography guide? Download our PDF cheat sheet. We’ve seen all types of property photos, from dark and blurry
Is virtual staging about dropping furniture into photos and calling it a day? You’re about to find out… As you might have guessed already, the